1 October 2021
Background
- Grinders can be used to reshape tools and other metal objects. They are only one means of sharpening and honing tools.
- An electric motor drives a grinding wheel. Grinders are made to revolve at different speeds according to use, and the wheels are made of different materials. Some machines (e.g. Tormek) use a water-bath to keep the wheels and tools cool while sharpening.
- There are three separate sharpening stations at the Guild:
– the Bench Room, for sharpening plane blades and carving tools
– the Turning Room, for sharpening woodturning tools
– the Forge, for shaping and sharpening forged tools and other metals - There are separate practical grinder/sharpening accreditation sessions for each station.
- Guidance on learning sharpening skills, including the use of jigs and rests, can be provided by SIG leaders and assessors responsible for each of the three sharpening stations. The forge area has some specialist grinding machines requiring separate instruction. This includes use of wire and polishing disc/wheels.
Safety
- Wear proper personal protective equipment
– eye and face protection is required
– respiratory protection and hearing may be required, depending on the work. - Do not wear loose clothing, unrestrained long hair, work gloves, neckties, rings, bracelets, or other jewellery that can become tangled with moving parts.
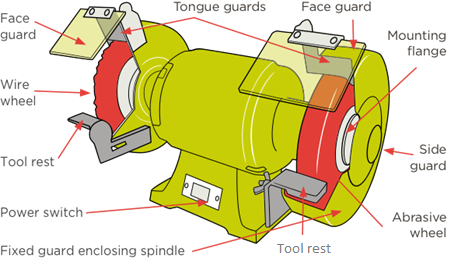
- Work rest height should be on horizontal centre line of the machine spindle.
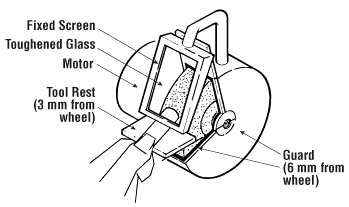
- Adjust tool rests to within 2-3 mm of wheels. If the wheel is worn, this may not be possible. Report this as the wheel likely needs replacing.
- Never adjust rests while wheels are moving.
- A tongue guard or a movable guard (which shrouds most of a wheel) where fitted are designed to stop pieces of the grinding wheel from flying out in the event the wheel shatters. It should be 6mm clear of the wheel. Do not remove guard.
- Before you turn the grinder on, manually spin the wheel to make sure it is spinning freely.
- Stand to one side of the grinder until the wheel reaches operating speed.
- Wherever possible, use a tool rest or jig to sharpen tools. This helps to provide sharp, uniform and repeatable cutting edges. Please see separate notes for wet stone grinding and sharpening turning tool for examples where rests and jigs are impractical.
- Do not adjust the tool rest or touch the wheel while the grinder is running or winding down.
- Bring work into contact with the grinding wheel slowly and smoothly, Use only the pressure required to complete a job. Think ‘less is best’.
- Move the work back and forth across the face of the wheel if possible. This movement prevents ruts and grooves from forming.
- If the grinder or wheel makes an unusual noise or vibration, or the tool is not sharpening as you expect, turn off the grinder and seek assistance from the SIG Leader or Shed Boss. Enter details in the maintenance book.
- Wheels are made only for grinding certain items. Do NOT grind wood, plastics or non-ferrous (iron) metals, such as aluminium and brass, on any of the grinding wheels.
- Do not grind rough forgings on a small precision grinding wheel.
- Only one person may operate this machine at any one time.
- Clean and tidy area after use. Be aware that metal filings generated by grinding can be an irritant; it is prudent to use a mask if sweeping the work surface and area in the vicinity of the station.
Safety Checks for users before they start operating the grinder
- Always check wheels (e.g. Aluminium Oxide) for cracks or other damage before starting. If there is damage, turn off the grinder and report it to the SIG leader/ record issue in maintenance book.
- If a grinder wheel has grooves worn in, it will not sharpen properly. Turn off the grinder and seek assistance from the SIG leader to dress (flatten) the surface of the wheel.
- Ensure bench grinders are secure on the work bench or pedestal.
- Ensure all the guards are in place and secure before using a grinder.
- Ensure the nuts holding the wheel are tight before you turn the grinder on. If the wheel is loose, don’t use it, report it to the SIG leader.
- Make sure the electrical cables to the grinder are not damaged and in good condition.
- Keep the cables are secured and out of the work area.
Sharpening woodturning tools in the turning room
- Guild members may sharpen their own tools using jigs, or freehand if they wish. However, Guild woodturning tools should only be sharpened by trained Guild members using the tool rests and jigs in the turning room.
- The turning room has two high-speed bench grinders for sharpening woodturning tools. The sharpening station consists of three 80-grit Cubic Boron Nitride (CBN) wheels, and an 80 grit Aluminium Oxide (White) wheel.
– Grinding on the face and sides of the CBN wheel is permitted. Only grind on the face of the Aluminium Oxide wheel.
– Carbon Steel turning tools should only be sharpened on the Aluminium Oxide wheel in the turning room.
– Only High Speed Steel (HSS) tools may be sharpened on the CBN wheels in the turning room. Other types of tool steel may clog and damage the CBN surface. CBN wheels have 4 times higher abrasive resistance, 55 times higher thermal conductivity and twice the hardness of aluminium oxide wheels. They are ideal for sharpening all Wood Turning Tools, including V10 or any High Speed Steel (HSS) tools. CBN wheels have the advantage of neither overheating or burning tools. - The turning sharpening station has tool rests, and different types of sharpening jigs for use on its bench grinders. Members are encouraged to use both, where possible.
- It is acceptable to allow High Speed Steel tools to heat up when being ground, especially when using a CBN wheel. Note: Carbon Steel must be continually quenched and kept cool or it will lose temper.
Sharpening blades, woodworking and carving tools in the bench room
- Observe the above safety rules
- Grinding wheels and stones used in the bench room are set up to use water as the lubricant. These are slow speed grinders. These features help reduce heat build-up.
- Prior to their use, grinder wheels in the bench room must be well saturated in water using the water trays attached to the machines. Always check the water level during use and fill the tray when it falls below the fill line.
- Do not leave grinder wheels in water when not in use.
- Always use jigs and tool rests when sharpening with the abrasive wheel rotating towards the
- tool being sharpened.
- When honing, with the leather honing wheel rotating away from the tool (the tool may be handheld).
- When in doubt seek assistance and report all issues to the SIG leader/shed boss.
IMPORTANT
Please read about how the grinders in the bench room operate and sharpening tips. Anyone wishing to use the (Tormek) grinders at the Bench Room sharpening station, should read this document. Please re-read them prior to seeking accreditation.
Sharpening and shaping tools and other metals in the forge/metal workshop area
TBA – Prior to use, please speak with the Tool Appreciation SIG leaders for instructions.
References and readings
Safe Operating Procedures – Bench Grinder (University of New England)
The Slow Grind – Sharpening Slowly with Your Bench Grinder (Timbecon)
Water stones vs wet stone grinders vs slow speed bench grinders – which is better? (Timbecon)
Everything you need to know about grinding woodworking tools on a bench grinder (Stumpy Nubs)
Stumpy Nubs provides a detailed series of videos about grinders, wheels (including types and benefits of CBN), grinding (including ways to avoid over heading), and sharpening with a focus on woodworking. See links below in the notes of this link for the rest of the video series. It’s worth taking the time to watch all.
Fundamentals of Machine Tools – Training Circular No. 9-524, Department of the (US) Army, Washington DC, 29 October 1996
Covers a range of topics relevant to metal work. Chapter 5 – Grinding machines. Chapter 2 – instruction regarding the properties of metal.
Sharp, Very Sharpe and Frightening Sharp (Jim Davey)
Grit comparison chart (Jim Davey)


