Revised May 2024
Purpose
The Table Saw is used to make crosscuts, ripping cuts, mitres and bevels. If properly used and set up, it capable of cutting material very accurately.
The brand of table saw that we have is a SawStop, that has a built-in safety mechanism that will mitigate against injuries that may occur in the event of accidental contact with the blade while the machine is in use.
Safety
- Always wear eye protection and use hearing protection. Dust protection is recommended. Avoid gloves, loose clothing, or anything else that may be at risk of contacting the blade.
- The SawStop is equipped with an electronically triggered brake to mitigate the risk of serious injury. This safety mechanism works by detecting when the blade comes into contact material that conducts electricity. Due to how this mechanism works, you must not cut any of the following materials:
-
- ‘Green’ or wet wood
- Metals of any sort
- Carbon fibre
- Mirrored acrylic
- Other materials that may conduct and electrical charge.
- The safety mechanism is still in operation when the table saw has been switched off and the blade is still slowing down. Do not attempt to clear offcuts or removed your workpiece until the blade has come to a complete stop and the lights on the front of the machine do not show any red.
- Do not cut material in a ‘freehand’ manner. Always use some form of guide mechanism such as a rip fence, mitre slide, sled, or another appropriate jig.
- There are multiple blades that can be used on the table saw. If you are uncertain when changing the blade, seek assistance from an experienced operator.
- The Dust Collection Blade Guard is installed by default but can be removed if needed given the type of operation required. It must be replaced by default if you have removed it when you are finished with your work.
- Always use a push stick or other suitable device to help guide work pieces and prevent ‘kick back’. This can occur when material contacts the that back of the blade which is moving upwards from the table surface, resulting in the material being pushed upwards and backwards.
- Keep the floor area around the table saw clear of obstructions and debris that may be a tripping hazard.
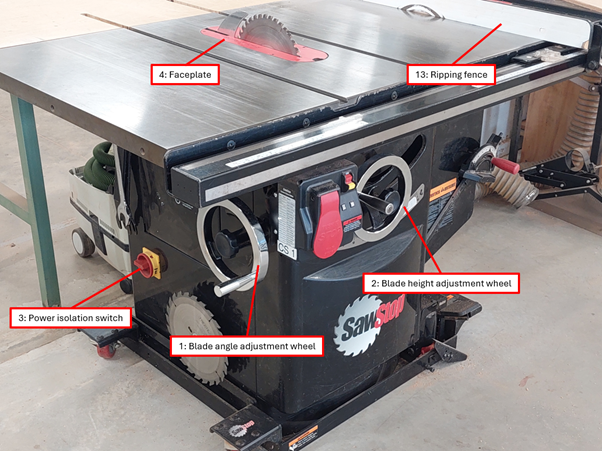
Components of the table saw
- See diagrams on the right.
- The saw blade can be raised or lowered using the wheel located on the front of the machine.
- The saw blade can be angled up to 45 degrees to the left using the wheel located on the left side of the machine (see component diagram reference number 1).
- Blades for the table saw and tools required to change the blade are stored on the left side of the machine.
Operation
There are two main modes of operation for the table saw that these safety notes will focus on. These are ‘ripping cuts’ and ‘crosscuts’.
There are additional means of using the table saw that involve the use of specific jigs. If you want to use the additional jigs, you should seek assistance from an experienced operator or SIG coordinator.
General operation
- Choose the correct blade for the type of work being done. ‘Ripping cuts’ require a blade with fewer teeth, whereas ‘crosscuts’ require a blade with more teeth. If you need to swap the blades, follow the process below or seek assistance from an experienced operator.
- The blade height should be set so it does not extend more than the depth of the gullet (cutout between the teeth on the blade) above the height of the piece being cut. However, when ripping thin stock, the blade extension may need to be increased to avoid the greater chance of kickback (gullet of the teeth well above the timber). Tighten the locking wheel after adjusting the height of the blade.
- If you need to remove or replace the Dust Collection Blade Guard, follow the process below and seek assistance from an experienced operator.
- Ensure that there is adequate support to hold the workpiece. Never use the table saw ‘free hand’.
- Ensure dust extraction is switched on.
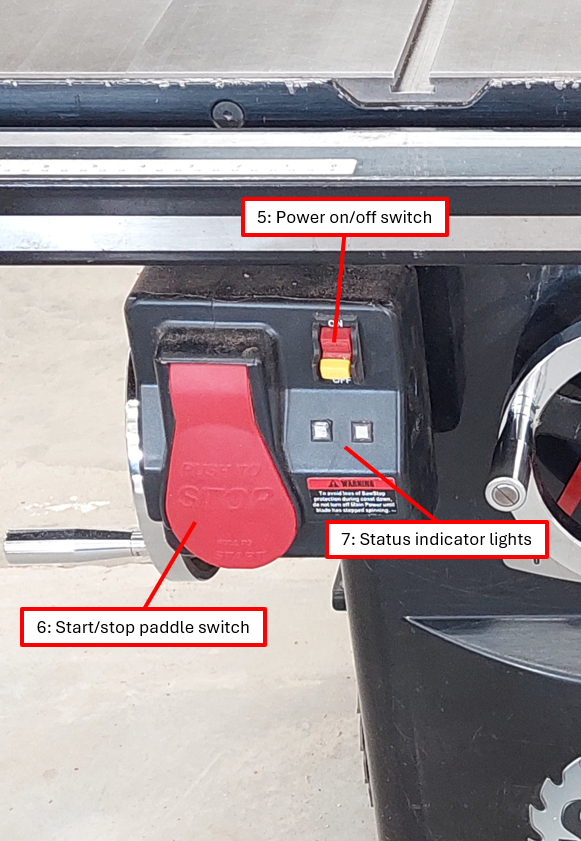
- Turn the power to the table saw on (see component diagram reference number 5 and 3).
- Wait for a constant green light indicator (see component diagram reference number 7). If there is any combination of lights other than constant green on one light only, seek advice from a SIG coordinator or shed boss.
- The paddle switch is used to start and stop the table saw (see component diagram reference number 6).
Changing the blade
- Turn the table saw off (see component diagram reference number 5) and isolate the power using the switch on the left side of the machine (see component diagram reference number 3).
- Remove the faceplate (see component diagram reference number 4).
- Raise the saw blade to the maximum height.
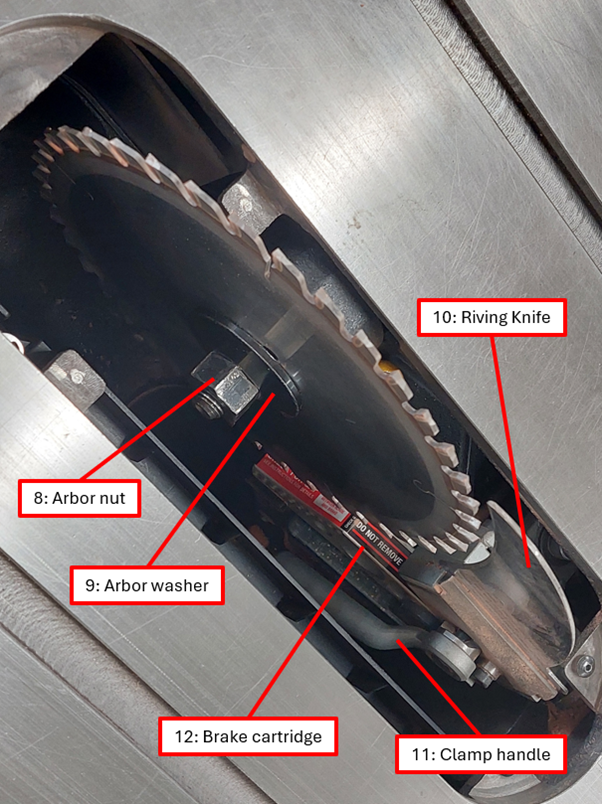
- Remove the Arbor Nut and Arbor Washer (see component diagram reference number 8 and 9).
- Remove the current saw blade and replace with the one you need to use.
- Ensure that there is a clearance between the teeth on the blade and the brake cartridge (see component diagram reference number 12).
- Check that the blade and the Riving Knife or Dust Collection Blade Guard are aligned.
- Reverse steps 4 to 1.
Removing or replacing the Dust Collection Blade Guard
- Turn the table saw off (see component diagram reference number 5) and isolate the power using the switch on the left side of the machine (see component diagram reference number 3).
- Remove the faceplate (see component diagram reference number 4).
- Raise the saw blade to the maximum height.
- Loosen the mechanism that holds the Dust Collection Blade Guard or Riving Knife in place using the Clamp Handle (see component diagram reference number 11).
- Remove Dust Collection Blade Guard or Riving Knife and replace with the desired component.
- Check that the blade and the Riving Knife or Dust Collection Blade Guard are aligned.
- Reverse steps 4 to 1.
Ripping cuts
In this method of use, material is supported on the table saw surface and guided by the ripping fence (see component diagram reference number 13). Given the length of your workpiece, you may need to obtain assistance from another person in supporting your work piece on the outfeed side of the machine.
- Ensure that the material to be cut is sitting flat on the table saw surface and is adequately supported against the ripping fence.
- Check for clearance through the entirety of the cut before commencing. It may be necessary to remove the Dust Collection Blade Guard and replace with the Riving Knife.
- Where possible, use a fixed feather-board to assist with holding the work piece against the fence.
- Start the table saw using the paddle switch (see component diagram reference number 6).
- Push your work piece, aided by a push stick or other appropriate aid, through the full length of the cut in one single motion. Slower cuts will generally produce a nicer finish. Do not stop mid cut or you risk burning the work piece.
- Stop the table saw using the paddle switch (see component diagram reference number 6). You can do this with your leg to avoid having to move your hands over the blade if this is easier for you.
- Do not attempt to clear your workpiece of offcut until after the blade has ceased moving and the indicator light on the front of machine is showing constant green.
Cross cuts
In this method of use, material is supported by either a slide or sled.
- Ensure that the material to be cut is sitting flat on the table saw surface and is adequately supported against a slide or sled.
- If needed, adjust the angle of the cut as desired. Be aware that adjusting the angle will result in different clearances for your workpiece and the slide or sled.
- Check for clearance through the entirety of the cut before commencing. In this mode of cutting, you will generally need to remove the Dust Collection Blade Guard and replace with the Riving Knife. You will always need to remove the Dust Collection Blade Guard if you are using a sled.
- Ideally your work piece should be secured to the mitre slide or sled using a clamp or similar mechanism.
- Start the table saw using the paddle switch (see component diagram reference number 6).
- Push your work piece, aided by a push stick or other appropriate aid, through the full length of the cut in one single motion. Slower cuts will generally produce a nicer finish. Do not stop mid cut or you risk burning the work piece.
- Stop the table saw using the paddle switch (see component diagram reference number 6). You can do this with your leg to avoid having to move your hands over the blade if this is easier for you.
- Do not attempt to clear your workpiece of offcut until after the blade has ceased moving and the indicator light on the front of machine is showing constant green.
When you have finished your job
- Turn the power off and make sure the machine has stopped running before leaving the area.
- Always return the saw to the zero setting(s) on completing your job and lower the blade completely into the table saw.
- If you have removed it, replace the Dust Collection Blade Guard.
- Clean up all sawdust and offcuts. Offcuts should be placed in the bin provided and when that is close to being full, should be emptied into the trailer. Sawdust should be swept up and the area vacuumed.
- Report any maintenance issues or malfunction to the Shed Boss or SIG Coordinator and make a record of issues in the maintenance book.