Revised November 2021
Safety
- Hearing protection must be worn.
- Do not wear gloves or loose clothing.
- Long hair must be covered and not loose (tied up or hair net).
- Do not stand directly behind the timber on the in-feed side and make sure that other members are not inline further back.
- Keep hands clear of the cutting area unless the power is turned off and unplugged.
- Get assistance with long lengths of timber.
- Power cords on the floor pose a trip hazard and cords may be damaged. Hang cords safely overhead where possible or at least away from thoroughfares.
- If in doubt ask an experienced operator.
Thicknesser components
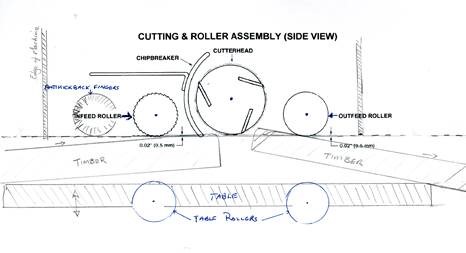
- The internal components of the thicknesser are: kickback fingers, in-feed roller, chip breaker, cutter head and out-feed roller.
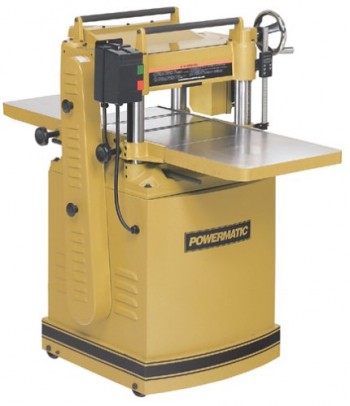
- The external components of the thicknesser are: raise/lower handle, table locking knobs, on/off switch, suction hose connection, feed rate controller, depth of cut limiter and a thickness scale.
Before you start
- Check timber for metallic inclusions with metal detector – commercially bought timber may have remnants of metal staples.
- Thoroughly clean timber with a stiff brush if required.
- Check ends of timber for grit inclusions – preferably dock ends of re-cycled timber.
- Do not stand planks on their ends on the floor as timber can pick up grit.
- Planks should have one face and possibly one edge made straight and true on a jointer before thicknessing to final dimension.
- Check and empty external dust extraction bin if more than ¾ full.
- Planks of timber to be thicknessed should be a minimum length of 300mm. The length of stock can be extended by gluing longer boards to each side of the stock; it can also reduce the risk of snipe on stock (see below).
- Avoid timber with loose knots. The minimum thickness that can be produced is 5.0 mm. Timber thinner than this may disintegrate; be aware thicknessing stock across the grain (i.e. grain 90% to the cutter) is likely to damage stock especially thin stock.
- Ply wood, MDF and chipboard should not be processed using the thicknesser.
Operation
- Before operating ensure that the main dust extractor is turned on and the blast gate is open. For best results, the blast gates for the other machines not in use are closed. The switch for the extractor is on the machine room wall nearest the external dust extraction area.
- Timber should be positioned close at hand but ensure it is not a trip hazard.
- Before starting the thicknesser, measure the thickness of stock at points along its length to determine the maximum depth of the timber that is to be processed. Be careful of boards that have a taper as they will jamb if allowance is not made for the taper. If the timber does jamb, immediately turn off the machine, lower the table, and reset the cutting height to 1mm less than the thickest point.
- The maximum cut that should be taken for one pass is 1 mm. Set the depth gauge to about 1 mm less than the maximum height of the timber. A 1 mm cut reduces the risk of major tear-out, is deep enough to remove indentations left by the drive roller, and does not place unnecessary stress on the thicknesser. With some hardwoods, a 0.5mm cut is sufficient to remove the drive roller indentations.
- One half turn of the handle raises or lowers the cutter head by 1 mm. Use a rule rather than the thicknesser scale to determine the final dimension for your timber. The table can be locked in position. Only lock table on the final cut of multiple pieces of timber. To even out the wear on the cutter head, feed narrow pieces of wood to the sides of the in-feed opening.
- The cutter head rotates towards you on the in-feed side. To minimise tear-out the timber grain should be rising towards you on the in-feed side. Essentially, the cutter head must plane with the grain, not against the grain.
- Do not stand immediately behind the timber that is being fed into the thicknesser and ensure that no one else is in the same line. If the kickback fingers stick, a piece of wood can be ejected like a bullet with serious consequences. NOTE: Do not put stock of different thicknesses through at the same time. The kickback and front roller will hold the thicker piece, but the thinner piece can be ejected by (in and out feed) rollers at high speed. This applies to thicknessing the side of stocks of different widths.
- Turn the machine off before you move away. Clean up the machine and the surrounding area when you are finished. Use the dust collector hose and a brush to remove all chips from the machine. As this may require reaching inside the cutting area, switch off and unplug the thicknesser first.
- Feed narrow timber to alternate sides of the thicknesser to even out cutter wear. The tendency to feed everything in the centre increases wear there and can cause a problem when wide boards are thicknessed.
Problems
Poor surface finish may be due several things including: feeding the timber in against the grain, cranky grain, blunt blades or damaged blades.
SNIPE is slight thinning of the timber in the above 50mm zone causes because the timber is only held down by one or other of the spring-loaded rollers on either side of the cutter. A characteristic of thicknessers is that approximately 50mm of ‘snipe’ can occur at both ends of the timber if timber is not held firmly to the table as it enters and leaves the machine, this includes supporting longer boards so that their weight doesn’t change the angle the board enters the machine. Consider this potential waste when sizing your timber, especially if no further processing is intended. Subsequent thickness sanding will remove snipe. Snipe could always be cut off if there is length enough to do so. Slightly angling your stock through the machine, or lifting it as it enters, can also help reduce the effect of snipe. But be careful of trapping fingers under the stock; you won’t be able to pull them out once the cutter engages.

Problems with the thicknesser should immediately be reported to the Shed Boss, the SIG Coordinator the appropriate Accreditation Trainer. A note should be made in the Shed Diary and describe the incident in the Incident Book in the cabinet at the front door. A sign DO NOT USE should be placed on the thicknesser especially if further damage is likely to occur. If any unusual or sudden noise occurs, stop the thicknesser immediately and report as above.
Online help
6 Ways to Reduce Planer Snipe : 6 Steps (with Pictures) – Instructables

